This web page contains the text of articles for owners of the TI-99/4a from Issue 39 TI*MES (Winter 1992/93). It is of use to users of the TI-99/4a emulators.
Items from TI*MES Issue 39 Winter 1992/93
From the chairmans chair
T Stevens 1992
For the following artical you will require your Consol and TI Extended Basic. If you want to save the programs then you will need a tape recorder. That's all you will need.
I have been reading up on Sprites and have come across a few rather fancy things that professional programers use when writing games. Plus some other little routines. When I started the writing of games programs I found that my first hurdel was using the Joystick Command. I found it a very cumbersome animal and ended up with long lists of gosubs and the like, not to mention the complicated X & Y situations that had to be tested.
I will show you now how to run three types of joystick control. The first will be a way of moving your SPRITE only when the joystick is moved. This program allows you to move in all eight directions. It also is very precise.
(Includes corrections notified in Issue 40)
100 CALL CLEAR :: CALL SCREE

N(13):: CALL MAGNIFY(2):: CA

LL SPRITE(#!,42,16,100,100)


110 CALL JOYST(1,X,Y):: CALL

MOTION(#1,-Y*4,X*4) :: DISPL

AY AT(23,4):" Y=";Y," X=";X:

"-Y*4=";-Y*4," X*4=";X*4 :: G

OTO 110
As you can see the routine is very small and can be adjusted to your own games routine by altering the values. To explain what is going on I will go through the listing.
In line 100 the screen is cleared (Call Clear) the screen is then set to dark green (Call Screen(13). The Call Magnify(2) sets a single sprite to twice its size. In other words it occupies 4 character positions. We then with Call Sprite allocate number 1 to be the sprite number with a character of 42 the (*), with a color of white (16) and set the start position of the sprite at dot row 100 dot col 100. We have not put in any movement values, so it is stationary. Line 110 is the work horse of the routine. The routine loops on this single line. It starts with the Call Joyst routine. This looks at No 1. Joystick and sets the variables X and Y to be the operators. Call motion is then used to move Sprite (1) and the variables X and Y operated.
The rest of the program is display of the X an Y variables onto the screen. The routine when you run it is very smooth indeed. I will not go into the maths deeply but here is the basis of the Y X conditions. As you may or may not know when you move the joystick it returns values in the X Y positions of 4 or -4 or 0 when not operated. See
your handbook for a full discussion. Y contains the row and X the column velocities. If no movement of the stick is found then the value is 0, therefore the sprite stays still. If the stick is moved up then X will equal 0 but Y will equal 4. Our sprite needs negative row velocities to move up and positive velocities to go down.
To get round this we change the value of the Y. We do this by placing a minus in front of Y. This then makes Y=-4, so up goes the sprite.
However when Y equals -4 on the stick return then with -Y it returns a 4.
However the X does not have to be changed as it relates directly to the Sprite +- relationship.(A bug in Texy maybe). The sprite is sped up by the *4 operator. If you wish you can change this figure to any positive figure, this will alter the speed to your need. Try 2,8,16 for example. However if you go over 31.75 it will calculate out at 127 which will cause an error message.
As you can see this routine is in a loop but you can place this into a games or utility progam loop for use. To follow are two more joystick routines.
The first gives you new graphic row/column position every time the stick is moved.
The third is a progressive speed routine. This allows you to speed the sprite up then reduce it but moving the stick in the opposite direction. I will not discuss these. I will let you see if you can work them out.
100 CALL CLEAR :: CALL COLOR

(2,7,7) :: CALL SCREEN(11) ::

CALL HCHAR(24,1,40,64) :: CA

L VCHAR(1,31,40,96) :: CALL S

PRITE(#1,42,2,17,17) :: R,C=3


110 CALL JOYST(1,X,Y) :: X=SG

N(X) :: Y=-SGN(Y)


120 CALL GCHAR(R+Y,X+C,CH) ::

IF CH=40 THEN CALL SOUND(-6

0,110,9) :: GOTO 110 ELSE C=C

+X :: R=R+Y :: CALL LOCATE(#

1,R*8-7,C*8-7) :: GOTO 110


============


Go to top of page


100 CALL CLEAR :: CALL SCREE

N(13) :: CALL MAGNIFY(2) :: CA

LL SPRITE(#1,42,16,100,100)


110 CALL JOYST(1,C,R) :: X=(X

+C)*-(ABS(X)<124) :: Y=(Y-R)*

-(ABS(Y)<124) :: CALL MOTION(

#1,Y,X) :: DISPLAY AT(24,1):"

Y=":Y,"X=";X :: GOTO 110
[The following paragraph is as printed -sjs 2015]
I have seen in our magazine some very good CALL PEEK values.
I discussed in my artical PEEK and POKE some time back, some of the
more useful. when you have only the consol and the Extended Basic
plugged in you can only use PEEK. but it can be used by you. The RND
function of basic is good but slow. Have a look at this.
100 RANDOMIZE :: CALL PEEK(-

31880,A) :: PRINT A: :: GOTO 1

00
This program has to be generated with the randomize statement at the begining of your program to set the RND flags inside the machine. After that Call PEEK will generate any number between 0 and 99. If you want higher try CALL PEEK(-31880,A+l) now we have 1 to 100.
You may find this a little slow due to the print statement but it is much faster than old RND when you run it in program. You can also access DOUBLE RANDOM NUMBER ie 0 to 255 by using another Call Peek -31808.
100 RANDOMIZE :: CALL PEEK(-

31808,A,B)  :: PRINT A,B :: GO

TO 100
Speed is the thing to go for, as we noted above. Just to show you the difference in the RND and PEEK routines here is a program that will display that speed.
100 CALL CLEAR :: CALL SCREE

N(7) :: CALL MAGNIFY(2) :: CAL

L SPRITE(#1,42,16,100,100)


110 FOR N=1 TO 50 :: RANDOMI

ZE :: A=INT(RND*255) :: B=INT

(RND*255) :: CALL LOCATE(#1,A

/2+1,B+1) :: NEXT N


120 FOR N=1 TO 50 :: RANDOMI

ZE :: CALL PEEK(-31808,A,B) :

: CALL LOCATE(#1,A/2+1,B+1) :

: NEXT N :: GOTO 110
You do not have to put RANDOMIZE in twice but this example was done for you to see the two programs together and compare them.
Article by Stephen Shaw
You may have noticed that the PLATO interpreter is now available on disk- it requires an Editor Assembler grom and ram at >6000 in the module (Super Space, Super Carte or home built)
There are 500 disks of Plato data out there!!! Library-funds are alas now non-existant, as the last pennies were used to obtain a sampling of 50 Plato disks.
I must admit to a certain appreciation for any serious computer program which puts up on screen, as a menu selection:
PRACTICE: HUMAN REPRODUCTION
PLATO was not commercially sold here, and barely advertised in the States, so you may not have heard of it. It is a VERY old educational tool produced by Control Data Corporation for use in schools (on those large pre-home computer computers!).
PLATO is in the form of an interpreter which uses data on subject disks to go through tutorials and drills. There is little in the way of graphics, and no sound - the TI implementation pushes TI's modules pretty far in terms of memory size and there was no room for any extra stuff.
Except that very late on they managed to squeeze some speech onto THREE disks!
PLATO material covers ages 5 upwards - anyone fancy a course on Nuclear Physics?
Sorting many items
My experiences of using a SMALL computer came in handy at work- required: a sorted output from 400 data items from a program that could only handle 220 items. The data was well and truly random!
Solution: Split the raw data into two chunks about the middle mark. Sort each of the two chunks.
From each chunk: extract data to form half of the total when added to a similar amount from the other chunk- in this case, we ended up with two files, one for A-J and one for K-Z. Each of these was of a size that could be sorted and then the two files (which now did not need sorting) could be appended to form a fully sorted file for A-Z. No-one else could think of how to do it!
$$1 file or - FUNNY DISKS
If you ever find a disk which your disk manager program tells you has a single file upon it called $$1, occupying only 7 or so sectors, and at the same time tells you that 360 sectors have been used (or in some cases 358 when the first two are ignored by some managers), you probably have a PLATO disk, which has the all important data USUALLY found in Sector 1 actually all the way out at Sector 167. This means you cannot catalog the files very well the usual way.
Of course you could copy Sector 167 to Sector 1 to catalog the disk, but the information still would not be very useful, being made up of very odd names.
Go to top of page
Feather or Mira Fractal
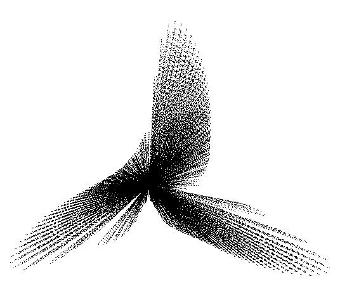
This is a very little program with a great deal to offer, and many of the finest graphics workers have been associated with it. My first contact was in the American magazine ALGORITHM (#3.3) (edited by famed mathematician A K Dewdney) in an article by equally famed computerist Clifford A Pickover. It is this form of the program printed below.
While I was still exploring this very rich world of images, along came the UK magazine
FRACTAL REPORT (#23) with an article by Paul Gailiunas, quoting from a book by Hans Lauwerier, of a mapping by Gumowski and Mira. The listing given there differed minutely from this one.
The shape is defined by variables AA and B, which are best located between the values of -1 and +1. AA seems to control the shape - the number of "legs" - while B seems to control the level of intricacy.
Some combinations of variables will result in the plot quickly becoming inescapably entwined with one or more attracting fixed points. No need exploring those too much. Many combinations result in a feathery form appearing.
I found better results keeping AA negative.
There seems to be a special case when B is +1, when a different family of patterns can be found. Reducing the scalar multiplier in line 140 is often necessary when you do this.
Variables X and Y are the start locations. With feather plots they seem to have little effect on the result, but when B=1 they can make a difference.
Here is the original program:
100 AA=-0.48 :: B=0.93 :: C=C-2*AA :: X=3 :: Y=0

110 W=AA*X+C*X*X/(1+X*X)

120 !

130 FOR N=1 TO 1E12

140 CALL LINK("PIXEL",X*8+95,Y*8+120)

150 Z=X :: X=B*Y+W :: U=X*X :: W=AA*X+C*U/(1+U) :: Y=W-Z

160 NEXT N
The program is written for, Extended Basic + The Missing Link (which requires 32k + disk system). ANY program that allows you to plot on screen is suitable, and there are several such.
The variables X and Y are multiplied by a scalar which determines the size of the image
on the screen, and an offset is then added (or could be subtracted) which determines the position of the image on the screen (up a bit., down a bit etc).
This program is plotting a chaotic attractor.
The loop is VERY large, and you must determine yourself when a pattern has ceased meaningful development. For some plots I saw continued meaningfu1 plotting even at N=28,000 - while for others as few as 5000 points sufficed. The Missing Link allows you to dump to printer at any time, and you can break the program without losing the image- say to save as a TI Artist file. Other graphics languages may require you to add a CALL KEY routine to sense when you have had enough although this would slow things down a little.
This is the same program-slightly modified.
This time I have presented the program in one "random image" format, and you will find some images lacking development- just break and run again.
This listing is adapted from
Fractal Report (#22) and was presented there by Ian Entwistle.
(for the Missing Link):
100 ! ENTWISTLE GENERATOR 91

110 ! FROM GUMOWSKI & MIRA

120 ! -1<A<1     0.9<B<1.001

130 ! IF B<1 THEN CY<40

140 RANDOMIZE :: CALL LINK("BOX",1,1,192,240)

150 A=RND*0.8 :: IF RND<0.3 THEN A=A-RND*0.5 :: IF RND<0.1 THEN A=-A

160 B=1 :: IF RND<0.15 THEN B=B-RND*0.12

170 IF B=1 THEN CY=99 ELSE CY=30

180 SC=2 :: IF RND<0.2 THEN SC=3 :: IF RND<0.1 THEN SC=4

190 FOR T=1 TO CY

200 IT=994 ! better with MORE points

210 C=2-2*A :: X=4 :: Y=0 ! try random x and y also

220 W=A*X+C*X*X/(1+X*X)

230 FOR N=0 TO IT

240 CALL LINK("PIXEL",X*SC+85,Y*SC+123)

250 !

260 Z=X :: X=B*Y+W :: U=X*X

270 W=A*X+C*U/(1+U) :: Y=W-Z

NEXT N :: SC=SC+1 :: CALL LINK("PRINT",180,200,STR$(SC)) :: NEXT T

290 GOTO 290
In the above variation as an added bit it has been made into TWO loops, the outer loop controlling the scalar multiplier. We then plot a SMALL number of points, then do it all again with a different multiplier. The result is quite interesting!
FRACTAL REPORT [used to be] ten pounds per year (approx bimonthly) from Reeves Telecommunications Labs Ltd, Cornwall
ALGORITHM [was] a quarterly from Canada, a years sub to the UK [was] US$24 from:
ALGORITHM, London, Ontario
The basic function is well used in many graphic math programs-
Xt+1=RXt(1-Xt)
In this example we are plotting on the X0-R plane.
The next little listing takes absolutely ages to fill the screen, so I will give some details to justify it. As usual the commercial disk program THE MISSING LINK is used, but any language allowing you to plot single pixels will suffice.
The program plot is based upon: X(T+1)=R*X(T)*(1-X(T))
Normally this would be used to plot X(T) on the X-R plane, which yields a bifurcation plot, which we covered a while back, but this program instead plots X(T) on the X(0)-R plane which gives a different result.
Source: L D Magguilli writing in ALGORITHM (see above) Oct-Dec 1992, Volume 3 Number 4. He cites M Szyszkowicz.
100 SW=2

110 SH= 190

120 RS=3.5 :: RE=4

130 DR= (RE-RS) /SH

140 XS=0 :: XE=0.5

150 DX=( XE-XS) /SW

160 IT=3

170 SC=20

180 FOR J=1 TO SH

190 R=RE-J*DR

200 FOR I=1 TO SW

210 X=XS+I*DX

220 Y=X

230 FOR K=0 TO IT

240 X=R*X*(1-X)

250 REM see notes

260 NEXT K

270 K=INT(SC*ABS(X-Y))

280 IF K/2=INT(K/2) THEN CALL LINK("PIXEL",J,I)

290 NEXT I

300 REM

310 NEXT J

320 GOTO 320
Notes:
Also try adding as line 250:
X=3*X*(1-X)
and or changing line 270 to:
K=INT(SC*X)
Both these changes produce even slower plots.
This program may take several hours to fill the screen! If you have 80 column capability, try plotting different colours for different values of K in line 280- try adding (new line 275) a programming equivalent to:
COL=K MOD (number of colours plus one)
Go to top of page
TI WRITER FOR NOVICES
Also see:
A summary of TI Writer commands. This article expands on that and is more for total novices.
This article is for you if you have TI WRITER and no manual (or lack the time to read it). The manual is available as a 10MB file from whtech.com.
The menu choice varies depending upon which version you have but is usually 1. EDITOR and 2. FORMATTER. Other options should be covered in text files on the disks. (These are DV8O or DIS/VAR 8O etc).
First, EDITOR. This creates a full screen editor, on which you create your text. The screen "paper" is 8O columns wide, and is shown to you 40 Columns at a time.
You do not have a full single character horizontal scroll - the screen is split into three columns of 40 characters: the leftmost screen display is the first 40 columns (columns 1 to 34 of your text if you have the line numbers displayed). Then if you move the cursor to the right, you will trigger a switch to display columns 21 to 66, and finally 41 to 80.
When you select EDITOR you will note the cursor appears at the top of the screen, on what is called the COMMAND LINE. The use of this line is described in the section below on TEXT EDITOR COMMANDS.
First, lets create some words!
See at the top of the screen some words, with some letters in CAPITALS? For instance Edit... the capital E means that if you ENTER an E on this line you go into EDIT mode... so ENTER a letter E.
Did you hold shift down or have ALPHA LOCK on? No need to when in this area: even with ALPHA LOCK off, capital letters will be entered. Entering E Causes the COMMAND line to leave the screen and you are presented with the start of your paper, on which you can type your letter.
To return to COMMAND line, you press the keys FCTN and 9 ("BACK") First though, lets look at all the instructions you can give to the computer while staying in the Edit mode ....
SHIFT and ALPHA LOCK have their usual uses! And you have an auto-repeat on the keys. If you need to auto repeat a character using the SHIFT key, you can release the SHIFT key when auto repeat has started and just hold the main key down - SHIFT will be assumed to continue until you release the key.
ENTER will place an odd character on the screen, which looks like a small C over a small R - this is the Carriage Return symbol, and is NOT printed.
It is important when REFORMATTING - more later!
When you come to the end of a line and keep typing, WORD WRAP will move you to a new line automatically, and also ensure that you do not have a word cut in half in the process.
Unfortunately, word wrap takes a finite time, and many even moderate typists will find that it pays to check the first word at the start of the wrapped line for missing letters - our console lacks a keyboard buffer, and any keys pressed while word wrap is in progress are ignored.
To end a paragraph, press ENTER and you will move to a new line, and a CR will be inserted at the end of the previous text.
Before we move on... TI WRITER is key-compatible with Wordstar, should you use that program on another computer! However, in this article I shall not deal with the Wordstar keys, but rather with the more convenient use of the TI Function keys. Funlweb has some extra function keys also.
As space is limited, each Edit mode command can only be described briefly here, but the following should help you make progress:
The Arrow keys: FCTN E S D and X move the cursor one space in the appropriate direction.
CTRL L moves the cursor to the top Left of the screen, but keeps the screen display the same.
CTRL 6 moves the cursor to the first word in the paragraph it is in the middle of, AND moves it to the top left of the screen - therefore moving the text on screen, usually upwards!
PARAGRAPHS are collections of words between CR symbols. That is, each CR marks the end of a paragraph.
CTRL 8 is New Paragraph- it has the same effect as ENTER, it adds a CR to the end of the current line and moves the cursor to the next line.
CTRL V moves the cursor to the start of its current line
CTRL 9 is New Page- it inserts not only a CR but also a PA, which is also not printed- the PA symbol will cause your printer to move to a New Page.
CTRL 4 is a tricky one- NEXT PARAGRAPH. When you type CTRL and 4, the text moves up off the screen and the cursor moves to top left. However, the line of text that your cursor was on does NOT have a CR added to it!
FCTN 5 is Next Window and enables you to quickly flick through the three columns of page. It is cyclic - from far right you go back to far left.
FCTN 4 is Roll Down - the cursor moves down 24 lines ( having the appearance of moving the text up 24 lines- the cursor keeps its position on screen!). If there are not 24 lines below the cursor, it moves to the end.
FCTN 6 is Roll Up and moves the cursor up 24 lines.
FCTN 7 is TAB (more later) and moves the cursor to the next tab setting on the right, while CTRL T moves the cursor to the next tab position to the LEFT.
CTRL 7 is interesting - it is the Word Tab. If there is no text after the cursor, the cursor will move one space right, otherwise it will move to the start of the next word.
All those commands move the cursor around - and for speed, remember that you have an auto-repeat function on the keys!
Other keys you may use in Edit mode are:
FCTN 9 (or FCTN +) to go back to the COMMAND LINE
CTRL 1 is your OOPS key... in the commands below, if you press the keys in error you can recover by immediately pressing CTRL 1. NOTE that word IMMEDIATELY - I don't mean quickly! but rather that pressing any key between the commands listed below and Oops, will stop Oops working!
FCTN 1 - deletes character cursor is sat on.
CTRL K - deletes all text to the right of the cursor
FCTN 3 - Not only deletes text but deletes the actual line!
CTRL 5 - really useful this one, it duplicates the line above! - HOWEVER it will also delete the line the cursor is on, so dont use it if the cursor is sitting on text you wish to keep!
Go to top of page
Thats the end of the commands Oops can reverse. Now for some more...
FCTN 0 is a toggle which enables you to display or not display the line numbers on the left sidepf the page - they are not printed anyway.
FCTN 2 is INSERT CHARACTER. Under normal circumstances, it opens up a line for text to be typed in. When done, remembering to end with a space! IF one is needed - press CTRL 2, which is REFORMAT.
FCTN 8 is INSERT LINE, and works by moving the line the cursor is on DOWN, leavinq the cursor on a blank line.
CTRL 3 changes the screen colour combinations - not very many choices but better than none!
With WORD WRAP off (toggled with CONTROL 0), we are in FIXED MODE and the following key commands alter:
INSERT CHAR (Fctn 2) will merely push the text to the right as you enter the inserted material - very like using INS when entering a Basic program. And when the text is pushed to the right hand side of the screen, it starts qettinq deleted, so careful!
REFORMAT (Ctrl 2) is used to terminate insert mode, also terminated by use of the other cursor movement keys.
New Paragraph, Last Paragraph, and Next Paragraph do not function in fixed mode
Those are the directly active keys
You can also insert commands to your printer into the text, using CONTROL MODE.
[2015 note: The TI Printer was an Epson MX80/ FX80 dot matric printer which used the "Epson Escape Codes" embedded in the output to the printer to control printer functions.]
CONTROL MODE makes available from the keyboard, ASCII characters 0 to 31 , so that you can send those codes to the printer : they are NOT printed, unless that is a part of your printer instruction set : see your printer manual for details.
You enter control mode by pressing CTRL U, which causes the cursor to become an UNDERLINE ( Notice the cursor shape always tells you which mode you are in: Word Wrap, Fixed, or Control).
With the UNDERLINE cursor, you have access to the lower ASCII codes by pressing the following key combinations: ASCII 1 to ASCII 26 are simply SHIFTED A to Z - thats easy to remember!
ASCII 0 (zero) is a SHIFTED ZERO ~ thats easy to remember!
Then you'll need to write these down:
ASCII 27 is FCTN R
ASCII 28 is FCTN Z
ASCII 29 is FCTN T
ASCII 30 is SHIFT 6
ASCII 31 is FCTN U
As you enter these low codes, odd characters will appear on the screen - they will not be printed! - you will get used to their appearance in time. They are based on the HEXADECIMAL equivalent of the codes. Remember to switch OUT of control code to use ordinary keys- toggle with CTRL U.
Your printer may for instance require a character 15 to switch to gondensed print mode. To insert a character 15 in your text, you need to key: CTRL U then SHIFT D then CTRL U again.
ESC is short for ESCAPE and is the ASCII value 27 or FCTN R.
Consult your printer manual for details of the codes your printer needs.
Note that TI Writer and your printer may have similar codes: it is easy to be confused with the TAB settings on TI Writer and those of your printer: but they are different things! It is usually easier to use TI Writer TABs but for some difficuly jobs it may be better to ignore TIW TABS and set and use TABS on your printer - see your printer manual!
One example of compatible but different commands is the UNDERLINE: the keyboard has an underline as FCTN U - but my printer has an underline function available by using ESC - 1 and ESC - 0 (Escape, minus, one or zero). If I use both, the printer prints a continuous underline, with a broken underline one pixel above it!
PAGE START: When you switch your printer on, wherever the platten is - and the paper held by it - is marked in printer memory as the start of the page. The printer then keeps count of the number of lines printed. If your printer has a default page length of 66 lines, and after 40 lines you send a PA symbol, (the standard page feed character, ASCII 12), then the printer will move the paper up 66-40=26 lines.
If you manually move the paper up or down, the printer does NOT count that movement! So if you are using a Form Feed command, take care to avoid all manual paper adjustments!
To printout your text, go back to the command line, enter PF (Print File) and then the printer name (eg PIO) and off it goes. To save text to disk, enter SF (Save File) and then DSK1.FILENAME or whatever. To load text you use LF (LoadFile) then DSK1.FILENAME.
There is mqch more to TI Writer- we have barely covered the Editor portion (the manual is VERY thick!).
..
I use an expensive IBM word processor at work (Displaywrite 4 V 2)- and there are some things which are fast and simple on TI Writer that the IBM program either finds VERY hard, or sometimes cannot do at all. Of course it can do a couple of things TI Writer cannot do, but TI Writer is not to be sneezed at- I wrote a book with it, and all these items in TI*MES have been produced with it!
Go to top of page
PIXEL GRAPHICS USING XB ONLY
TI*MES #35 p31 and
TI*MES #27 p27
I had an enquiry from a user with Console and XB only, having problems applying the XB pixel plotting routine from issue 27. As others may have similar difficulty, here is my response...
When you replace
CALL LINK("PIXEL",XO+SC*X,94+SC*Y)

with

CALL PLOT(R,C,S)
there is a very important step which I think you have omitted: YOU must set the variables R and C to the row and column numbers that you wish to turn the pixel on at.`
eg:
R=X0+SC*X

C=94+SC*Y
There are two further points to consider:
SCALE: The Missing Link allows you to plot to a screen composed of 190*255 pixels. Using the Extended Basic plotter you are limited to redefining the characters available in XB (32 to 143= 111 chars). These can be anywhere on the screen of course.
In a very dense plot you would be limited to an area only 11 x 10 characters of 8x8 pixels, that is R from 1 to 80 and C from 1 to 88, so the SCale fac needs to be reduced by about a third. (SC=SC/3).
If- as often happens- the plot is not completely dense, with character places in the middle of the plot with no used pixels, you can often get away with using slightly larger area of the screen.
A good starting point would be to try amending the scaling factor, immediately after it has been set in the printed program: SC=SC/2.5
When the XB routine runs out of characters to redefine it just goes into a closed loop.
SCREEN SIZE
The Missing Link is also entirely happy plotting OFF screen, something the XB routine cannot handle, so you will need to add delimiters after R and C have been set:
IF R<1 THEN R=1 :: IF R >190 THEN R=190
IF C<1 THEN C =1 :: IF C>250 THEN C=250
The variable S is set at the start (as shown in issue #27) to the starting character code and is then used to keep track of which character is being redefined.
The Art of Assembly - Part 2 : Starting at the Bottom
by Bruce Harrison Copyright 1991, Harrison Software
In Part 1, we discussed the two approaches to program structure, Top Down and Bottom Up. In this article
we'll provide some "primitive" source code sections to provide services. Please note that, in Assembly, there
are about as many ways to do any given thing as there are programmers trying to do it. We'll try to provide
the rationale for the way we approach things as we go along. In general, our approach is to minimize
memory consumption and maximize speed of execution. Those two don't always go together, but in many
cases the most memory-efficient code also executes fastest.
Bear in mind that, for the time being, we're working in the environment of an E/A 3 (Load and Run)
program. Let's start with the matter of providing Workspace Registers. Many programs contain a source
statement like:
WS BSS 32
That's fine, but doing this uses 32 bytes of the available program memory for your registers. There is an
area in low memory designated for User Workspace, at address >20BA. To use that, you can make an
equate in the beginning of your source code like this:
WS EQU >20BA
Now at your program's start point, you can simply LWPI WS, and your registers will be at >20BA, not
taking up 32 bytes of program space. (Please note this should not be done when linking from Extended
Basic, unless your program never returns to XB until it's finished.)
Let's quickly move on to another subject, that of a subroutine to clear the screen for you. We've used many
different techniques for this, so let's explore a couple of alternatives. One can do it like this:
CLS       CLR       R013              Point R0 at screen origin

             LI         R2,SCRWID*24       Load R2 with total

             LI         R1,>2000               Make left byte of R1 the space

LOOP      BLWP      @VSBW              Write one space

             INC       R0                  Increment screen location

             DEC       R2               Decrement counter

             JNE       LOOP             If not zero, repeat operation

             RT                                         Return to calling program
Here you'll see one of our little tricks. Sometimes when starting a program, we don't know for sure
whether we want to operate in Graphics mode or in Text mode. Thus in many places in the program we'll
use the mnemonic SCRWID, then at the beginning of the program we'll put a value in for SCRWID
through an equate like SCRWID EQU 32 or SCRWID EQU 40.
This was really a two-barreled trick, because it also lets the assembler do some math for us. In this case, the assembler will multiply 24, the number of rows on the screen, by the number of characters per row (SCRWID) and thus will load R2 with the correct number of spaces to fill the screen. The above method will work, but won't be as fast as a
method using VMBW to write whole screen lines to the screen. We can gain some speed by setting aside
a block of 32 or 40 characters' space, writing a space into each of those, then writing 24 such lines to the
screen. There would need to be a block of bytes reserved, like this:
SCRLI BSS SCRWID
There's our friend SCRWID again, this time telling the assembler how many bytes to reserve for a screen
line full of characters. Now the code to clear the screen gets more complicated and takes more memory,
but executes faster:
CLS       LI         R2,SCRWID   Sets R2 to characters in screen line

             LI         R5,>2000     Sets left byte R5 to space

             LI         R3,SCRLI     Point R3 at SCRLI

             MOV       R3,R1           Point R1 at SCRLI also

LOOP1   MOVB     R5,*R3+       Move one byte and increment R3

             DEC       R2                 Decrement R2

             JNE       LOOP1           If not zero, repeat

             CLR       R0         Point R0 to screen origin

             LI         R2,SCRWID   Set R2 again

             LI         R4,24           24 rows to clear

LOOP2   BLWP     @VMBW           Write SCRWID bytes to screen

             A          R2,R0           Add that many bytes to R0

             DEC       R4                 Decrement R4

             JNE       LOOP2           If not zero, repeat

       RT                               Return to calling program
That block of memory which we set aside as SCRLI can be used for other purposes, as you'll see when we
get to some other subroutines. We can, for example, use it to stash strings.
Before we go further with subroutines, we ought to discuss how to properly "nest" them in Assembly. If
you're used to programming in Basic or XB, you know that subroutines may include GOSUBs to other
subroutines, and that so long as each ends with RETURN, all will be well.
In Assembly, the calling of a subroutine by BL @SUBNAM will work properly only if the subroutine does
not call others. To get around this problem, we establish a "stack" to keep track of our subroutine return
addresses. To do this, set up a data area somewhere (perhaps at the very end of your program) which will
contain the return addresses for nested subroutines. A simple entry such as:
SUBSTK BSS 24
This 24 bytes will suffice to hold 12 levels of nesting. The other requirement is to have a pointer to keep
track of position in that stack. We simply dedicate R15 to that purpose. Somewhere in the beginning of
the program, we insert LI R15,SUBSTK, so that before we call any subroutines, R15 points to the
beginning of that stack.
Now in any subroutine that calls others before it returns, which we define as a High level subroutine, we
place this instruction at the beginning of the subroutine:
MOV R11,*R15+
That puts the R11 return address in the location pointed to by R15, and makes R15 point to the next word
in the stack area. At the end of one High level subroutine, we place the following code:
SUBRET DECT R15               Point back to previous stack word

             MOV *R15,R11   Move that word to R11

             RT                       Return.
Other high level subroutines can return by a simple B @SUBRET. Note that simple subroutines that do
not in turn call others, which we'll call Low level subroutines, need only the RT at their ends to return
properly. The stack area can be placed anywhere. We recommended putting it at the very end of a program
so it's open-ended, as long as the program doesn't fill all of the computer's memory. Placing it elsewhere
is OK so long as you're sure about how many levels of nesting are required. If you underestimate,
something important could get overwritten by your stacking.
Let's say that you are writing a High level subroutine which needs to have the screen cleared before it can
proceed. The subroutine would look something like this:
BIGSUB MOV R11,*R15+      Stash R11 on SUBSTK

             BL    @CLS             Clear the screen

                     (rest of subroutine)

          B        @SUBRET      Go to the high level return
This assumes there is already another High level subroutine which ends with the code shown above at
label SUBRET. By this method, subroutines may be stacked to any number of levels without losing track
of the return address of any subroutine.
Now we'll move on to a few more handy subroutines, and introduce the idea of multiple entry points. Let's
say you'll need an ability to move strings around in memory, and you'll also need the ability to move groups
of bytes that are not organized into strings. (For our purposes, a string is merely a group of bytes where
the first byte is the length, and the rest of that many bytes is the string. For example, we might have a
string initialized in our data section like this:
CPYWRT BYTE  14                  Length of text

                     TEXT 'Copyright 1991'
The first byte is 14, which is the length of the string that follows.
Now let's suppose that we want to move that string to another location which we'll call TEMSTR for
Temporary String. Assume that at least fifteen bytes of memory have been reserved at that place. We'll
be using R9 to point to the origin of the string and R10 to point to the destination address. We can preload
registers with the addresses to move from and to, like this:
             LI       R9,CPYWRT     Put address of CPYWRT in R9

             LI       R10,TEMSTR   Put address of TEMSTR in R10
Now that pointers have been set, we can proceed with a BL @MOVSTR, where the subroutine looks like
this:
MOVSTR MOVB   *R9+,R4         Get length byte in R4

             MOVB   R4,*R10+       Place that byte at R10 location

             SRL     R4,8               Right-justify length in R4

MOVBTS MOVB   *R9+,*R10+   Move one byte, inc pointers

             DEC     R4                   Decrement length count

             JNE     MOVBTS           If not zero, repeat

             RT                               Else return
This subroutine uses R4 as a counter for the loop at MOVBTS. We here at Harrison conventionally use
R4 and R5 for loop counters or other temporary numbers. But just for a moment let's assume you have
a need to move a group of bytes from one place to another but they're not organized as a string, in that
there's no length byte at the beginning. Let's say you have 75 bytes to move from location XYZ to location
ZXY. Here you can use the label MOVBTS as a second entry point to the subroutine. You'd do it like this:
             LI       R9,XYZ         Place source address in R9

             LI       R10,ZXY       Place destination in R10

             LI       R4,75           Number of bytes in R4

             BL       @MOVBTS       Call subroutine MOVBTS
This technique has been used many times in our programs, and we've found it very useful, in that it's more
efficient in use of memory than having two separate subroutines with such similar functions.
Next, let's look at a very small subroutine which has an important lesson to teach us. Assume that you've
got many places in the program that require a single-keystroke entry, such as the answer to a Y/N
question. To prepare for such a subroutine, we'll put the equates STATUS EQU >837C,
KEYADR EQU >8374 and KEYVAL EQU >8375. Then near the start of our program we'll insure that
our key-unit is zero by writing this one line of source code CLR @KEYADR. We'll also need somewhere
a byte initialized to the value >20, such as ANYKEY BYTE >20. We can then use the short subroutine
like this:
KEYLOO CLR     @STATUS                   Clear the GPL Status byte

             BLWP   @KSCAN                     Use utility to scan keyboard

             CB       @ANYKEY,@STATUS   Has a key been struck?

             JNE     KEYLOO                     If not, try again

             MOV     @KEYADR,R8             Else put key struck in R8

             RT                                         Then Return
You'll notice that there's an extra instruction in there which moves the word at >8374 into R8. The left
byte of that word will be zero, and the right byte will be the value of the key struck. Thus the register's
value will equal the ASCII code for the keystroke.
We do this on purpose because, in most cases after we return from this subroutine, we have to do a series of comparisons to the key struck. Having the key's value already in a register makes that process easier, and moving the key value into a register before exiting the subroutine uses less memory than doing it after return. Suppose we had asked a Yes/No question, and want the default answer to be No. Upon return from the above subroutine, we could have:
             CI   R8,89     Is answer upper case Y?

             JEQ YES         If so, Jump

             CI   R8,121   Is answer lower case y?

             JNE NO           If not, answer is No

YES                               (perform action for Yes)

NO                                 (perform action for No)
The activity at label YES may be a simple branching to some other part of the program, and label NO may
be a simple continuation of some process, but that's not important to our point. By moving KEYADR into
R8 in the subroutine, we'll save many bytes of memory if this kind of comparison needs to be done each
time we've used the subroutine. The point is that the content of a subroutine should be considered very
carefully. A small added function like we've shown in the above example can add up to significant savings
of bytes by incorporating it into the subroutine instead of having to repeatedly perform the operation
outside the subroutine.
In this article, we've just scratched the surface of the subject of subroutines. In the next article, we'll go
back to the subject of structure for a bit, and discuss some of the minimum required things to get a
program started and ended gracefully. In later articles of this series we'll move into more advanced
subroutines, some of which will depend on things we presented here.
Go to top of page
[ TI Book front page |
TI Resources Page
| PC99 Review
| PC99 Programs
]